Showing posts with label Artistically Inked. Show all posts

July Demonstrator Training Program Blog Hop

Hello Stampin' Friends! Today I am participating in Bruno and Kylie Bertucci's Demonstrator Training Program Blog Hop. Bruno and Kylie offer training to Stampin' Up! Demonstrators to assist us in building our businesses. If you arrived here via the blog hop, I am Susan Edwards from the US. Welcome.


Today's card has a story, and it began yesterday at our team's monthly Zoom meeting. We had a mystery stampin' challenge. I ADORE mystery stampin'! The way it works is, you are given a list of general supplies to prepare. Then, in our case, you follow verbal instructions and assemble your card your way. 

Yesterday's general supply list was:

  • Cut a 5" x 4" piece of designer series paper,
  • Make a card base from matching cardstock,
  • Cut or punch a sentiment tag, and
  • Gather any embellishments you choose to use.
I chose the Expressions in Ink designer series paper, and I cut it with the large Scalloped Contour die - which just happens to be 5" x 4". I chose thick white chardstock for my base card, and I embossed the card front. I cut a white tag with the Painted Label dies. And finally, I cut the detailed butterfly with the Butterfly Wings Dies in a coordinating piece of Expressions in Ink dsp and the solid butterfly layer in In-Color Shimmer Vellum. I had no idea what we were going to do with these elements.


At the end of our meeting we were instructed to make three angle cuts in the 5" x 4" piece of designer series paper and to affix that to the front of our card. We were instructed to use Stampin' Dimensionals to affix our label to the card front. Finally, we were told to embellish.

Using the elements I had pre-made, this is the card I created. I am not going to lie, I like that my card was different because I used the scalloped die cut. Everyone else just had a rectangle. 


I finished my card by embellishing it with In-Color gems and touches of ribbon and lace.  Forgetting that this was a THANK YOU themed card hop, I used the Happy Birthday stamp from the Best Year stamp set. Oops. Hopefully, Kylie will forgive me for that lapse. 

Thank you for hopping by today. I hope that you enjoyed my card and that you also enjoy the rest of the hop!

Product List

Place Setting Summer Garden Favor Box


Hello Stampin' Friends. Are you ready for a 3-D project? I made this sample Favor Box which would be perfect a table setting favor for a summer garden party or a tea party. And of course, all of the materials I used are Stampin' Up! products.

I began with the Artistically Inked dies and cut only half of the design. To took a photo of this (below) so that you could see how I did this. Simply, I cut 2.75-inch strips of white cardstock with my paper trimmer and cut those strips with the die, using less than half of the die area.


Next, I took a stylus and traced around my die cut image, noting where the flowers ended and the leaves and greenery began. Then using a Blending Brush and Polished Pink Ink, I lightly inked in my flower areas. Next, I used a dauber and the Soft Succulent Ink and inked in my leaves. Finally, I glued the die cut over the inked in areas.


I hand trimmed around the edge of the die cuts and applied them with glue to the front and back of the box.


The boxes are available in my online store, and they are SUPER-DUPER easy to assemble. The gold top of the box has a little loop of ribbon which is adhered inside the lid. I made a triple bow with the pink ribbon and a double bow with the lace. I laced the two bows into the loop on top of the box. I then went inside the lid and pulled one side of the ribbon loop tabs to tighten the loop. Finally, I tied a single twine bow around the ribbons. I finished the top with a little Thanks tag.


I am quite pleased with how these little boxes turned out. I finished each box with a band of Designer Series Paper around the bottom of the lid. 

Below I will add links to my store for everything you will need to recreate this project! Thank you for stopping by today.


Product List

International Highlights Winners Hop


Hello Stampin' Friends. I am participating in Kylie Bertucci's Monthly International Blog Highlights, a blog hop for the top ten finalist in her regular International Blog hop. If you arrived here via the blog hop, I am Susan Edwards from the USA. Welcome!

Today's card uses the gorgeous Artistically Inked Bundle. I used both Stampin' Blend Markers and Classic Ink pads to add color to my floral bouquet. And as you can see, I am still crushing on the Polished Pink in-color - the ink, the cardstock, everything! 

Base card: 8.5 x 5.5 inches, scored at 4.25
Matting: 3.75 x 5 inches, cut with rectangular die
Basic White cardstock for the die cut and the floral elements under
Black Ink for the thanks sentiment
White tulle ribbon
Artistically Inked Ephemera - the gold and the sequins.


Thank you for hopping by. I hope you enjoy all the fabulous projects presented in the blog hop. Below you will find a link to the materials I used. 


Product List

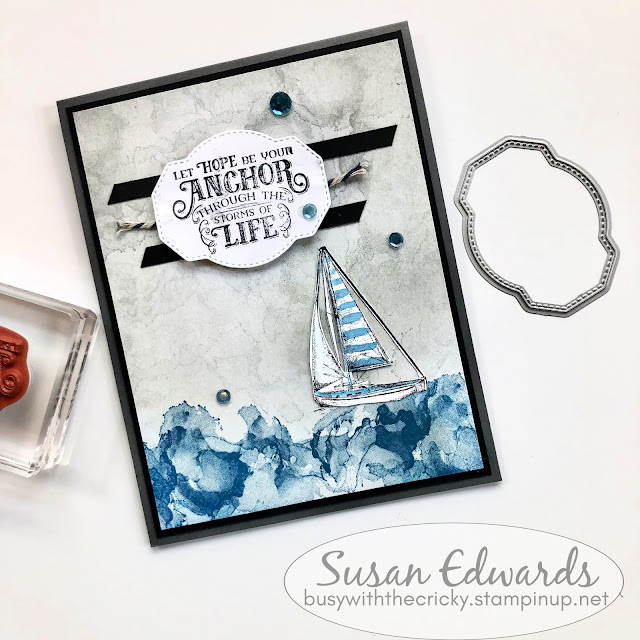
Let Hope Be Your Anchor

Hello Stampin' Friends. In my last blog post I used Stampin' Up!'s gorgeous Artistically Inked Suite to create a VERY PINK, very floral card. Today I am going to show you how to use the same stamp set and create a completely different look, creating the encouragement card above. 

Below is a photo of Stampin' Up!'s Artistically Inked stamp set. I have put an orange rectangle around the stamp I used today. I call this the "background" stamp.


I began with the Sailing Home stamp set. I stamped the large sailboat image onto basic white card stock in Stazon Ink. I stamped an empty stamp block in Pacific Point ink, and using a Water Painter brush, I water colored the sailboat image.
 

While the watercolors dried, I took the background stamp from Artistically Inked, using Pacific Point ink, I stamped the bottom edge of a 4x5.25-inch piece of card stock. I stamped twice to cover the entire bottom.


Next, I used Smoky Slate ink and a Blending brush and brushed a layer of ink on the upper three-quarters of the card front.


Still using Smoky Slate ink, I used the same background stamp with the stamp off technique and stamped the entire upper three-quarters of the card. 


This is what the card base looked like when I finished stamping with the background stamp


To finish the card, I cut out the sailboat and affixed it to the front of the card. I cut two .25-inch strips of black cardstock and a length of twine. I stamped the sentiment on a tag (which was also stamped ever-so-lightly with the background stamp) and using Stampin' Dimensional dots, I raised the sentiment above the decorative element. I used Stampin' Blend markers and darkened the color of the sequins before applying them to finish the card front.


I enjoyed creating this card as it used the background stamp in an unusual way. I think it works so well as my ocean.

Thank you for dropping by today!!

Product List