Showing posts with label 
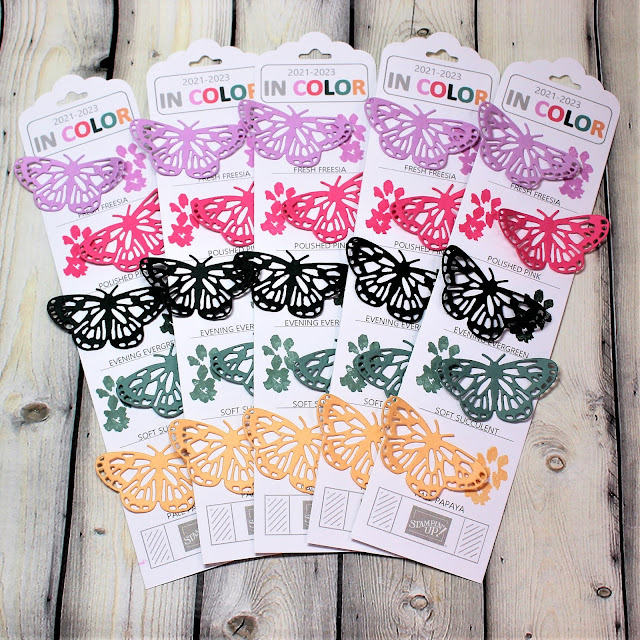
Butterfly Bouquet Bundle. Show all posts

July Demonstrator Training Program Blog Hop

Hello Stampin' Friends! Today I am participating in Bruno and Kylie Bertucci's Demonstrator Training Program Blog Hop. Bruno and Kylie offer training to Stampin' Up! Demonstrators to assist us in building our businesses. If you arrived here via the blog hop, I am Susan Edwards from the US. Welcome.


Today's card has a story, and it began yesterday at our team's monthly Zoom meeting. We had a mystery stampin' challenge. I ADORE mystery stampin'! The way it works is, you are given a list of general supplies to prepare. Then, in our case, you follow verbal instructions and assemble your card your way. 

Yesterday's general supply list was:

  • Cut a 5" x 4" piece of designer series paper,
  • Make a card base from matching cardstock,
  • Cut or punch a sentiment tag, and
  • Gather any embellishments you choose to use.
I chose the Expressions in Ink designer series paper, and I cut it with the large Scalloped Contour die - which just happens to be 5" x 4". I chose thick white chardstock for my base card, and I embossed the card front. I cut a white tag with the Painted Label dies. And finally, I cut the detailed butterfly with the Butterfly Wings Dies in a coordinating piece of Expressions in Ink dsp and the solid butterfly layer in In-Color Shimmer Vellum. I had no idea what we were going to do with these elements.


At the end of our meeting we were instructed to make three angle cuts in the 5" x 4" piece of designer series paper and to affix that to the front of our card. We were instructed to use Stampin' Dimensionals to affix our label to the card front. Finally, we were told to embellish.

Using the elements I had pre-made, this is the card I created. I am not going to lie, I like that my card was different because I used the scalloped die cut. Everyone else just had a rectangle. 


I finished my card by embellishing it with In-Color gems and touches of ribbon and lace.  Forgetting that this was a THANK YOU themed card hop, I used the Happy Birthday stamp from the Best Year stamp set. Oops. Hopefully, Kylie will forgive me for that lapse. 

Thank you for hopping by today. I hope that you enjoyed my card and that you also enjoy the rest of the hop!

Product List

Hints and Previews


Hello friends. Today I have fun news to share with you about the May release of the NEW 2021-2022 Stampin' Up! Annual catalog (wild cheers)! The catalog will release for customer purchases on Tuesday, May 4th. If you placed an order with me in the last 12 months, you will be receiving the new catalog in the mail (more wild cheers)! This will be especially helpful in building your wish list. Today I planning to share two new hints/previews from the new catalog.

Each year Stampin' Up! release five new limited run colors. The new five colors are in the line for only two years. The year the colors release we refer to the new colors as our In-Colors. The 2021-2022 In-Colors are some of my absolute favorites! They are pictured in the photographs above and below. The colors are (in order from the above photo):

Fresh Freesia

Polished Pink

Evening Evergreen

Soft Succulent

Pale Papaya


I am also giving you a sneak peek today of not just the new colors, but also two additional products. In the photo above you see In-Color tags cut with our new tag dies. I LOVE THESE DIES! They include two different styles of tags in four different sizes each! They also include the hole reinforcer circles. 

Also pictured above is the soft succulent colored ribbon. This same ribbon is available in all of the new In-Colors!

Finally, my last sneak peek today is the stamped and embossed flowers above. I stamped the flowers onto Stampin' Up! vellum with VersaMark ink and used Stampin' Up! White embossing powder to create the stunning tag front. The flower stamp is from the Elegantly Said Suite of products. Oh, and just wait until you see the punch that coordinates with the stamp set!

Thanks for stopping by for the quick share and peek!


Color Brushed Butterfly Blog Hop


Hello friends, today I am participating in a blog hop hosted by Kylie's Stampin' Up! training program, featuring the Butterfly Bouquet bundle. I have a confession.... Shhhhh.... I am not a butterfly fan, but I LOVE THIS BUNDLE! I have had so much fun trying new techniques and new layouts featuring these beautiful butterflies. I also love the pretty pops of spring that I can add to the butterflies. 

To create this card I started with a piece of white cardstock. I used our A-MAZ-ING blending brushes and applied five colors of ink onto the paper in a random pattern. I blended the edges of the inks together, creating a multi-splotched piece of cardstock. I used the individual detailed butterfly dies, placing them on the paper, and cut out my colorful butterflies.

I wanted to use vellum behind the detailed butterflies, but I was all out, except for one little circle (and yes, I did use that). I also wanted to use a Stampin' UP! product. So... I opened my Paper Pumpkin kit box and used the aqua tissue paper and the butterfly outline die to cut the solid backs for my butterflies. They are not quite as transparent as I had hoped, but I was quite happy with them.


The Butterfly Brilliance Bundle is pictured below. It includes a large stamp, which stamps all of the butterflies at once and two sets of dies. The first set of dies is a detailed cut of each butterfly (like my colored butterflies in my project). The second die included is a large outline die that cuts the outline of the stamped butterflies all at once. So you can stamp once and cut once, to create six butterflies (I did this with the tissue paper)! 


For my base card I used Bermuda Bay cardstock. I used Coastal Cabana ink and stamped the large butterfly stamp onto Coastal Cabana cardstock to create the tone on tone background. This was affixed to a black matting and attached to the card front. I used stampin' dimensional dots to affix the butterflies to the card front.

Remember that circle of vellum I found? I used that to create an understated sentiment circle. I used a sentiment from the Blooming Blossoms stamp set. 

I finished the card with black gems and black ribbon. I thought the black created a nice grounding element with all of the color. 


It is Maundy here in the US, and also the day I will be receiving my second "Dr. Fouci Ouchie" - the second shot of my Covid vaccine. I am hoping that by next month I might be able to hold classes in person again!! Yay. I wish you all a blessed Easter!

Butterfly Bouquet Thank You - International Blog Hop


Hello friends. Today I joining you via Kylie's International Blog Hop and I am going to share another project made with the A-MA-ZING Stampin' Up! Butterfly Bouquet bundle. Have I mentioned that I adore this suite of products? I truly do. I love the versatility and the limitless creativity these products inspire. 

For those of you who like sneak peeks, the Butterfly Bouquet bundle is actually an early release from our NEW 2021-2022 Annual Catalog (which will be available later this year). The only catch is, the beautiful Butterfly Bijou designer series paper will NOT be in the new catalog. It will disappear on May 2. Be aware of that as you too come to love this bundle. 


Today's card is a vertical, top-opening layered card, featuring the butterflies and a few Easter eggs to create a gorgeous spring Thank you card. I started with a base card in Seaside Spray cardstock and created white textured mat using white cardstock layered in white butterflies. I used Stampin' Dimensionals to give this a layer a lift. 

The middle focal point of the card was also built in layers. I started with a 3 x 4 inch piece of cardstock. Onto that I glued 1/2 x 3 inch strips of the Butterfly Bijou dsp to create the multi colored background. I used the beautiful Stitched So Sweetly dies to cut two elements - the scalloped sentiment tag and the gold frame. For the frame I cut the largest scalloped die in gold sdsp. I then used my paper trimmer to remove the middle of the and created a scalloped frame. Stampin' dimensionals were added to the back of the frame to give it a lift off of the multi colored background.

I used the butterfly outline dies to and cut two butterflies from the Butterfly Bijou dsp. I used our gilded leafing to add touches of gold to the butterfly wings. I placed one side of each butterfly on top of the frame with a dot of glue while using stampin' dimensionals to adhere the other side of the butterflies. 

I had two Easter eggs already stamped and cut out (left over from another project) and sitting on my desk. I decided to add the Easter eggs to the card to show how easily a small addition can make a big impact on a project.


For more views and more details visit my online store HERE, or use the product links below.

On Kylie's Blog there is a contest of sorts happening. I am asking each of you to visit Kylie's site and check out all of the other beautiful Thank You themed projects. And if you are so inclined, please consider voting for my card. Click the button below to visit Kylie's blog.


March Virtual Stamp Camp

While I have you here let me mention my upcoming Stamp Camp! Check out all of details here in my newsletter HERE , including ordering deadline.


This month's host code is:  QZ3KTZCF

Below is a list of products I used to create today's card. Click on an image to be taken to my online store. 

Product List