Las Vegas Wedding Party & Banner


Hey there!  I am back today to share some of the crafty details from Aaron and Crissie's marriage celebration party.  The party was held at the lake home of our sweet friends Megan and Brandon (daughter and son-in-law of my friend Peggy).  We chose an evening time frame in order to beat some of the heat, though I must say Mother Nature was especially kind to us!!  The weather was wonderful!

The first craft idea I had for the party was the seven panel banner pictured above and below.  Megan and I thought it would be fun to carry though the Las Vegas idea since that is where they married and honeymooned.


I used four cartridges to create the pennants for the banner:  Las Vegas, Pretty Pennants, Tie the Knot, and Art Deco (the last two for their fonts).


Aaron and Crissie selected the photos used on the banner - this first one from a hockey game they attended.


I used the Mr & Mrs Cut from Tie the Knot, then added the word Edwards in a similar font.


Aaron and Crissie also chose this photo for the banner - a Halloween selfie of the two of them.


To continue with the Vegas them, I printed and cut decks of cards, poker chips and rolling dice.  The cupcakes were two flavors with three frosting colors to match the Vegas colors.


Every wedding party needs wedding cakes!!


Other menu items included Caprese Skewers, meatballs, and homemade cheese spread.


We also served veggies and dip, hummus and flat bread, fresh fruits and cheeses, spanakopita, quesadillas, and ham and cheese roll ups (a big hit).


Our beverage center was outside stocked with water, sodas, wine, beer, and a signature drink I called the Vegas Strip!


Above is Bethany with our friend Alex and her dad.  Below is Ian and Bethany.  I was so happy that Ian came in from Atlanta for the party.


Oh the irony!!! We never actually took a photo of Aaron and Crissie together. Below is Crissie surrounded by several of her co-worker.  They all had a great time.


First Swimming Adventure


Hello everyone, welcome to this week's Bitten By the Bug 2 challenge.  My wonderful Design Team sister, Sharon, selected this week's Cricut Challenge cut theme.  Sharon asked us to create a project about swimming or water.   I had just downloaded the photos of Avaleigh's first swimming pool adventure at her Aunt Christy and Uncle Josh's house.  She was not sure about the pool at first, but she really got in the spirit of water play after a bit.  


I am not going to lie, I used cuts from a lot of different cartridges.  Seriously, I used cuts from nine different cartridges on this one layout.  I used Once Upon a Princess to create that adorable mermaid, Animal Kingdom to create the kissing fish, Splish Splash to create a fish, Create a Critter to create the Starfish, Animal Antics to create the Snorkeling Fish, Doodlecharms to create the Sea Horse, Paper Dolls for Everyday to create the ocean floor, Life is a Beach to create the Seaweed.


I finished the layout with tiny air bubbles, assorted pink, champagne, and brown gems on the ocean floor as well as a sand (champagne) colored ribbon under the seaweed.  


I am pleased to say that there were no big events in our lives this week.  No one eloped, no one lost or found a new job, and everyone had a nice week!  I am planning a Vegas themed reception/party for Aaron and Crissie, but I do not plan to go as over the top as I have been know to when party planning. 

Thanks for stopping by today.  I do hope that you take the time to go by Bitten By the Bug 2 and see the amazing projects my design team sisters made for this week! They are so talented!!  Also, we do hope that you will join us in the swimming/water challenge this week!


Loving Strawberry Season


Hello everyone.  Today we are taking a break from paper crafting to talk about breakfast and strawberry season.  We are "smack dab" in the middle of strawberry season here in South Carolina.  My only problem with Strawberry season is that it is far too short.  As the berry crop began to come in locally, I created a new Pinterest board aptly titled Strawberry Season!  I pinned some really yummy looking strawberry recipes, including these WONDERFUL Strawberry Biscuits.  


So far this season we have had strawberry cobbler and a lot of strawberry shortcake variations - sometimes with ice cream, sometimes on home made biscuits, all with real whipped cream!  As much as we have enjoyed our strawberry desserts, I thought it might be nice to try strawberries for breakfast, other than in my yogurt.  I had pinned three strawberry recipes that looked promising, scones, muffins, and this biscuit recipe.  Well we may never try the muffins because this recipe was THAT good.


Strawberry Biscuits
(recipe adapted from Smitten Kitchen)
2 1/4 cups all-purpose flour
1 tablespoon baking powder
1/4 cup granulated sugar
1/2 teaspoon salt
6 tablespoons cold, unsalted butter
1 cup chopped very ripe strawberries
1 cup heavy cream (I used fat free half and half)
Preheat oven to 425 degrees. Line a large baking sheet with parchment paper or a silpat.
In a large bowl, whisk together your flour, baking powder, sugar and salt. Add butter and cut it in to the dry ingredients with a pastry blender, until it resembles a coarse meal. Stir in the strawberries carefully, so they get coated in the flour mix. This keeps them evenly distributed in the dough later when you add the liquid. Speaking of liquid… add the heavy cream, then gently fold all the ingredients together. You don’t want to overwork the dough, so don’t worry if everything is completely worked in. It will be.
Generously flour your counter or cutting board, then transfer the dough to the board. Flour the top of the dough and with your hands gently press the dough into a 3/4-inch thick rectangle. Using a 2 1/2-inch biscuit or cookie cutter (or even the top edge of a drinking glass) cut circles out of the dough. Press straight down without twisting (this makes for nice layered edges) as you cut. Carefully transfer the biscuits to prepared baking sheet, leaving a few inches between each one.
You can re-roll the scraps of dough, and continue cutting circles, but don’t worry if the dough appears very wet. The strawberries will have already started to release some of their juice. That’s okay though! They’ll still turn out beautifully.
Bake the biscuits for 15 minutes, until lightly brown at the edges. Cool in pan for a minute, brush on the butter recipe below, then transfer to a cooling rack. Serve warm.


I made a quick strawberry butter to slather on top of these beautiful biscuits. Just mash up two large strawberries into 4 TBLS soft butter, then freeze for about 15 minutes. (You can do this while the biscuits bake.) It’s a tiny detail that will make a world of difference in flavor.


My mom, Doug, and I all enjoyed the biscuits for breakfast AND lunch.  John took one home as an afternoon snack when he picked up Avaleigh.

Speaking of Avaleigh - this is from her latest photo shoot. John and Bethany have a variety of funny little costumes for her. This is their little fox pup!  

Thanks for stopping by.  I hope you enjoy this recipe as much as we did!!!


Baby Girl Layout


Hello friends!  This is my week to choose the theme of the Cricut Challenge at the Bitten By the Bug 2 blog.  We all know that I am totally besotted with my new granddaughter with my world revolving around all things Avaleigh!  It was very easy for me to select a theme for this week's Cricut Challenge - NEW BABY CHALLENGE (of course)!  I challenged the Design Team (and our readers) to create a card, layout, home decor project, or other NEW BABY ITEM.  I chose to create a two page layout featuring my favorite little baby girl!


I used four Cricut Cartridges to create these two pages - Baby Steps, First Few Years, Creative Memories Stork's Delivery, and Anna Griffin's Elegant Embellishments.  I confess that I have really been enjoying the Anna Griffin cartridges recently.  I love the elegant, versatile cuts.  I cut the scalloped backgrounds of both pages with Elegant Embellishments. I used Anna Griffin card stock (floral) for the top layer of the background and (blue) for the bottom layer of the background.  


One of the more difficult tasks with this layout was selecting which photos of our sweet baby to use on the pages.  After I found the image of the baby sleeping on the moon and clouds I went with these cute photos.


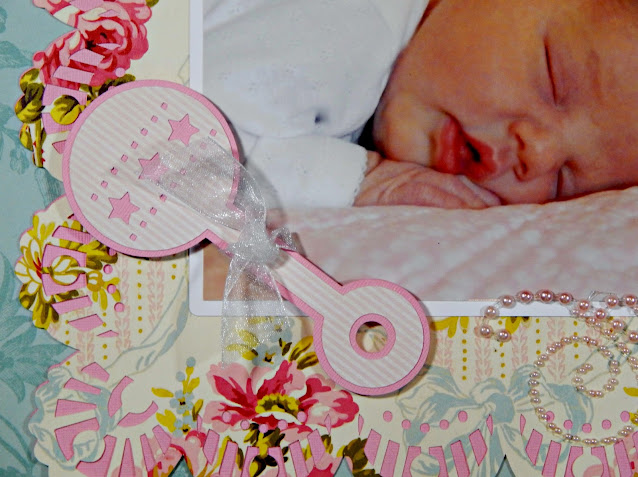
I used this adorable double layer rattle on the left page, along with sheer ribbon and pink pearl swirls. I also used the sweet baby girl three layer cut as a title on this page.


The right page has two Cricut cut embellishments, the sleeping baby and the baby blocks.  I added pink pearls and a pink bow to the baby cuts and used pop dots to adhere the embellishment to the page.


I hope that each of you will go by the Bitten By the Bug 2 blog and look at the other new baby projects created by the design team.  Also, consider joining us this week.  This is a fun challenge, if I do say so myself!!


A Visit From My Favorite Baby!


Hello friends!  Yes, I really am sharing more baby photos with you!! :)  I had a virus this last week and was on a self-imposed baby restriction for three days!  It was awful... Especially the day that Doug and my mom got to go visit Avaleigh without me!  But by Thursday I was feeling better and on Friday morning, after her one week check up, Avaleigh had her parents bring her by for a visit with gramma (or so I tell myself).


After her tough morning at at the doctor's office, followed by yum-yums from her mommy, Avaleigh was one tired little girl.  She did fight sleep for a bit and try to wake up to play with Gran Doug and I, but finally, sleep won out!


So yes, I got out my camera and took more photos of my favorite baby.  I then looked at all of the photos over and over after she went home!!!  I am so completely smitten!!


Because Avaleigh looks so big in the other photos, I am posting this blurry photo of me holding her so that you can see her real size.  I told her that she now weighs as much as her mommy did at birth! 


I do have a new post for both tomorrow and Monday, so stop back by for updates.


Meet My New Granddaughter!!


Avaleigh Skye Ross.
Born January 22, 2015
7 lb, 13 oz., 20 in.


Avaleigh was delivered via c-section so above it the first time Bethany could hold her baby!


Their sweet little family.


 Meeting Gramma for the first time!


Meeting Great Granny for the first time!


So very upset with that mean nurse who gave me my first bath!!!

,

Worn out after her bath, shot, weighing, poking, prodding, hair do, and getting dressed.


We are completely in love with the baby!!


A Poorly Photographed Layout and a Baby Update


Hello everyone.  Today I am going to share another poorly photographed wedding layout with you AND give you an update on my overdue granddaughter. 

Bethany was admitted to the hospital last night, given medication and was hooked up for monitoring. Avaleigh is being a stubborn girl and just does not want to meet us!  However, Bethany's doctor says enough is enough - today is the day!  This morning Bethany will be reevaluated and most likely will receive a Pitocin drip to start labor.  If nothing develops and there is not marked progress, Avaleigh will be delivered via c-section today.  The odds are against them for a natural delivery. The doctor said that 80% of women in Bethany's circumstances (lack of dilation, etc.) end up with a section. Bethany seems to be taking this all in stride, though she and John did call and talk to us last night. But then again that was probably to settle down Doug and I!!!  If all goes well I just might have baby photos to post tomorrow!


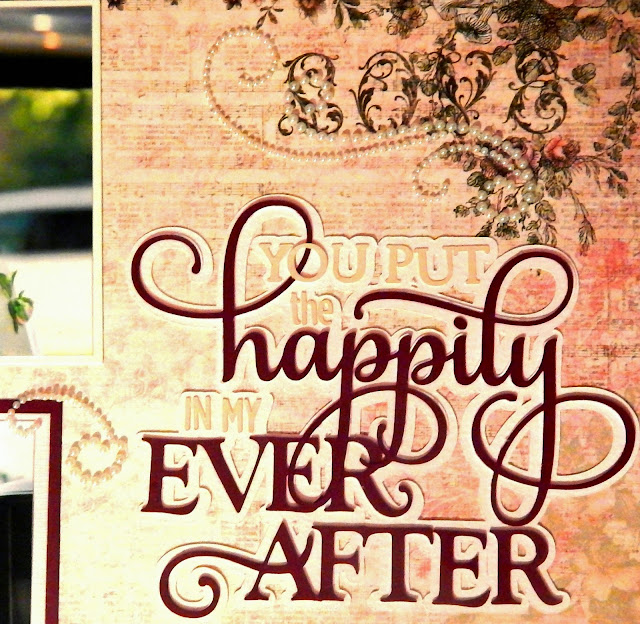
Now to paper crafting - this two page layout - again POORLY photographed - was created using printed card stock with solids.  I love, love the sentiment - You put the Happily in my Ever After.  I found this cut and the Mr. & Mrs. cut in the Silhouette America store.  


I used a lot of pearls to embellish this layout.

I hate that the photos are so dark, blurred, glarey, etc.  The layout really is darling when one can actually see it!


Thanks for stopping by today and be sure to check back tomorrow to see if we have baby news!!


Details Wedding Layout


Hello everyone.  Do you remember the old saying, "The Devil's in the details"?  I do not believe that.  I believe the finished look is in the details.  And that is what this layout is all about - the look of Bethany's wedding created with the details.

First, I MUST apologize for the color issues I have had with the last two layouts. Neither Monday's layout nor today's layout photographed true to color.  The colors are much better in real life.


I was a very fortunate mother of the bride in that my daughter had a vision of what she wanted for her wedding AND it was a look that I loved and had no trouble embracing and growing.


With this layout I feared any scrapping elements might over shadow the actual photos so I went with a simple layout:  I cut my printed 12 x 12 inch sheets of  card stock down to 10.5 x 10.5 inches and matting them onto Colonial White card stock. Using my Silhouette Cameo, I cut six double layer roses and two corner vines.


I assembled four of the roses the correct way, and for the other two I applied the negative area of the petal cutouts to the background rose.  I wanted to create a bit of contrast when I layered the flowers on the pages.


I cut the vine in a subtle cashmere color to enhance the pages, but not over take them.  I am very pleased with how the pages turned out, even if the photos do not reflect the true colors and details.


Please forgive any errors in this post - I am sure I missed many.  We like to honor the true 12 days of Christmas at our house so yesterday was Christmas decor de-decorating day where everything was taken down and put away - almost.  My Dickens Village is still out  and I must sort through bows and tags to see what is salvageable.  Yesterday was also my mom's 78th birthday so in addition to the Christmas deconstruction, I also hosted our family for Granny's birthday gathering last night.  It was a LONG day.  THEN I prepared this blog post. 

Thanks for stopping by today.  I will be back in the week more rested with a new post!