Ornate Garden Cards


Hello friends! I hope your day is going well. Today I am going to spotlight the Ornate Garden Suite. I have shared cards made with these products previously, but never three at a time. 

The Ornate Garden suite actually contains two bundles, Ornate Thanks Bundle and Ornate Style Bundle, as well as a fabulous embossing folder, Designer Series Paper, ribbon, and gilded gems. You can purchase this in individual pieces, bundles, or as an entire suite collection.


Today's first card is this simple pink and gray palette butterfly card. I used an ornate style lace die to create the gray lace frame. After cutting the die (with the center intact), I carefully used my paper trimmer to remove the middle section. This left me with the open frame above. I mounted the frame on pink cardstock embossed with the Ornate Floral embossing plate. Two butterflies were stamped and punched, using a different stamp and punch set, to add a bit of whimsy to the card. Finally, I used the Lovely Labels Pick a Punch and created the sentiment tag. 


This watercolor stamped card was featured in a previous blog post HERE. This is still one of my favorite techniques. Using the Stamp and Write markers, I color the ink onto the stamp, spritz the stamp with water, then stamp onto the white cardstock. 


This card makes a big visual impact, but was actually very easy to create. I began with a Pear Pizzazz cardstock base card. I cut a piece of the Ornate designer series paper for the front of the card. I used one of the gorgeous border dies in the Ornate Style die set to cut the delicate gold lace. I used one of the border dies in Ornate Thanks dies to create the gold elements for the front of the card. Using versamark ink and gold embossing powder, a sentiment was stamped onto whisper white cardstock. I used the Stitched So Sweetly dies to cut out the sentiment. Two embellishment flowers were stamped. The card was finished with two gilded gem embellishments.

Thanks so much for stopping by today. Before you go, I would like to remind you that we have two current specials: receive an extra $25 in host credit when your order or group of orders reaches $250 in sales.  And we also have a joining special. Join stamping up in June for $99 and you can select a $125 worth of products of your choice as well as a free bundle of your choice! Contact me with any questions about the specials.


Product List

It's A Beautiful World


Hello friends! I became so involved in making new cards yesterday that I forgot to share this post. Oops.

Today I am going to spotlight the World of Good suite of products. I shared these cards with my husband before posting them here and he immediately said, "Guy cards! Nice!" Yes, I did design Man-cards. But do not be deceived, these products also make some gorgeous lady cards as well. I will share those on another day.


For today's cards I used the Beautiful World stamp set and the World Map dies. I also used the World of Good Specialty Designer Series Paper, Gold Foil Sheets, Gold Gems, and gold twine.

The card above features a base card of Misty Moonlight cardstock, World of Good SDSP, Gold foil, and gold embossing on vellum. I stamped the western hemisphere stamp in versamark ink onto vellum, and used the heat embossing gun. I added a circle of blue cardstock behind the vellum for the nice ocean look.The small compass circles were stamped in night of navy ink and punched out with a small circle punch.


The card above features an Early Espresso base card with layers of the designer series paper. For this globe, I stamped versamark ink onto Seaside Spray cardstock and heat embossed in gold. I wanted to compare the two different looks. I believe the look in card #1, with the gold embossed vellum, creates a softer looking earth. I completed this card by embellishing with strips of DSP and gold gems.


My final card today began with a Night of Navy base card. I added solid and print cardstock layers, a simple stamped sentiment, gold gems, gold twine, and a stamped and heat embossed globe. I tried to make my globe resemble an ornament - thinking ahead here. 

Thank you for stopping by today. I will be back later in the week with more from the Ornate Garden Bundle and Birds and Branches.


Product List

Let's Celebrate Sunflowers


Hello friends! I am back to spotlight another of the new 2020-2021 Catalog bundles. Today's featured bundle is Celebrate Sunflowers. I have crafted three very different cards with the bundle to introduce you to different ways you may choose to use this set. Note: I have not scrapbooked with this set yet, but it WILL happen soon!


This first card was created using very traditional stamp and die cut layers. I stamped the sunflower image onto Whisper White cardstock and cut out the image with the outline die. I used the petaled sunflower die to cut the So Saffron cardstock, and glued that over the stamped sunflower. 

The sunflower is paired with a couple of stamped and cut leaves, a sentiment, and ribbon on a "planter" I created. The entire scene is matted onto blue and white tile designer series paper from the In Good Taste suite. The base card is Misty Moonlight, one of our new In Colors.


My Pretty Peacock and gold card was so easy to make, yet makes a big visual impact. I stamped Versa ink onto the front of the Pretty Peacock cardstock card base, and used gold embossing powder to heat emboss the sunflower images and the card sentiment. I used the petaled sunflower die and cut the gold foil sunflower. I cut a rectangle of gold foil to frame the die cut sentiment tag. The card was assembled with glue and small stampin' dimensionals. 


This third card was created using a different technique entirely. I used very thin magnet material and cut it out with the petaled sunflower die. I confess that I ran the die and magnet sheet through the cutter several times. After weeding the negative areas in the die cut, I applied So Saffron ink to the magnet material sunflower. I placed Whisper White cardstock over the ink and ran the layers through the die cut machine. This creates a faux Letter Press technique, where the image and ink are indented in the paper.

To assemble the card I began with the Bumblebee color card and envelope from the Flowers For Every Season Memories & More Cards & Envelopes set. This set includes ten cards, two each in the the new In Colors, along with matching envelopes. I cut a black cardstock matting, then I cut the letter pressed sunflower to fit off center over the black matting. I stamped a sentiment, added a strip of In Color designer series paper, and a bow. I finished the card with two gold gems.


I hope this mini tutorial was helpful to you. Below you will find links to my online store for many of the products I used to create these three cards. 


Product List

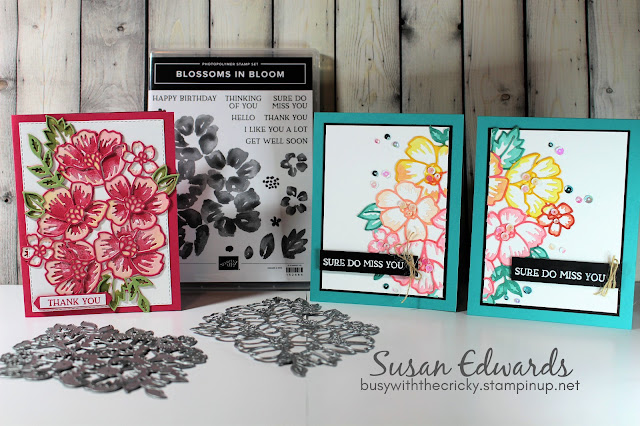
Blossoms in Bloom Bundle


Hello friends! I hope your day is going well. Today I am going to spotlight the Blossoms in Bloom Bundle. This bundle includes two sets of dies (three in each set) and a set of stamps. The potential of this set is something I am just beginning to be realize. 

The dies are two layers of cuts, the bottom layer is an open-centered filler for the petals and leaves, while the second die is a thin outline. If you look at the image below, you will see the different layers. The pale Blushing Bride petal sections and the dark green portion of the leaves are the bottom die cut. The thin outline and the lighter green section of the leaves is the top die.


To create this card I stamped the five flower main stamp in Melon Mambo. I cut the bottom layer of the die in Blushing Bride cardstock, then colored over the leaves with an Old Olive marker. I cut the top layer of the die twice, once in Melon Mambo and once in Pear Pizzazz cardstock. I snipped away the leaves from the Melon cardstock and replaced them with the leaves from the Pear cardstock. I glued all of the layers together, and added a Thank You sentiment to the lower left.


These two cards were created by cutting the large dies, bottom and top layers, once each, in Whisper White cardstock. I used Stampin' Blends markers, which come in a lighter hue and a darker hue, to color the layers. For example, the leaves are colored with the Pretty Peacock Stampin' Blends - lighter hue on the bottom, darker hue on the outline section. I did this hand coloring technique, working one flower at a time, over the entire two die cuts. Once I finished all of the coloring and glued the layers together, I cut the the bouquet in half with my paper trimmer. I used half of the bouquet on each of the two card fronts. 


As a reminder, if your Stampin' Up! wish list is bigger than your wallet, now is an excellent time to become a Stampin' Up! Demonstrator. This month only when you sign up you can select any bundle in the new catalog for free. You can also select $125 in Stampin' Up merchandise, anything in the catalog, all for only $99. Stampin' Up! will even throw in $50 worth of business products.  If you would like to hear more about this opportunity, contact me. If you would like to read more about this, visit my webpage.


Product List