June Demonstrator Training Blog Hop


Hello Stampin' Friends.  Today I am participating in Kyllie & Bruno Bertucci's Monthly Demonstrator Training Program Blog Hop. If you joined me through the hop, you are currently visiting Susan Edwards in Aiken, South Caroline, USA. Welcome.

I am sharing a card I made with the Stampin' Up! Elegantly Said Bundle.  The bundle contains beautiful stamps and a fun shaped tag punch. There is also Designer Series Paper that coordinates with the set, but today I made my own patterned "paper" by using the stamp and ink on plain cardstock.


I began with a rectangle of white cardstock and using Pale Papaya ink along with the floral stamp in the set, I stamped my floral background.  I then took a Stampin' Up! blending brush and bushed in additional Pale Papaya ink onto the white cardstock, creating the light papaya background. Next, I used Versa-mark embossing ink and stamped the beautiful lace swirl image from the Elegantly Said stamp set. I added Stampin' Up! white embossing powder and heat embossed the lace images. 

I used the same floral stamp and stamped onto Pale Papaya cardstock, then punched out the tag. I stamped my Thanks sentiment onto the tag.

I stamped the flower again onto vellum and heat embossed the flowers in white. I attached this to the tag and layered this on top of ribbon and a vellum doily and vellum rectangle. Before assembling the card, I used the edge die from the Hand Penned die set and scalloped the edges of the cardstock. 

I assembled the card using stampin' dimensionals to raise the top layer and finished it with gorgeous gems and a bow ribbon.

Thank you for visiting my blog today and I hope you enjoy the rest of the blog hop. 

Product List

Enhanced Summer Tray


Hello Stampin' Friends.  I have a question for you: have you ever looked at an item and just knew that with a bit of enhancement it would be perfect? That is exactly what I experienced with this tray. I was perusing the 50% off merchandise at a local craft store when I happened upon this tray. Immediately I could visualize seashells from the Friends Are Like Seashells bundle decorating this tray. And not just any seashells, but large navy and gilded seashells!


Last weekend I was off to a Stampin' Up! retreat in Sumter, SC, loaded down with stamp & die bundles, stamp & punch bundles, cardstock, designer series paper, ink pads, tools, and a vibe for fun! Oh, and this tray. Of the several projects I completed, this tray turned out almost exactly as my mental image. 

I began by stamping the seashells in Night of Navy ink. I then used the coordinating Seashell 3D embossing folder to add shape and texture to the shells. Finally, I used Stampin' Up!'s Gilded Leafing to embellish and bling up the seashells. 


I had completely forgotten that I owned French Seashell motif glassware. That was an added "ooh!" when I returned home. I hope to use this tray a lot this summer, serving beverages and food, both indoors and out. And I hope that this project causes you to think "off of the paper" when using your Stampin' Up!


Product List

Black and Pink with International Hopping


Hello Stampin' Friends.  Today I am participating in Kyllie Bertucci's Monthly International Blog Hop. If you joined me through the hop, you are currently visiting Susan Edwards in Aiken, South Caroline, USA. Welcome.


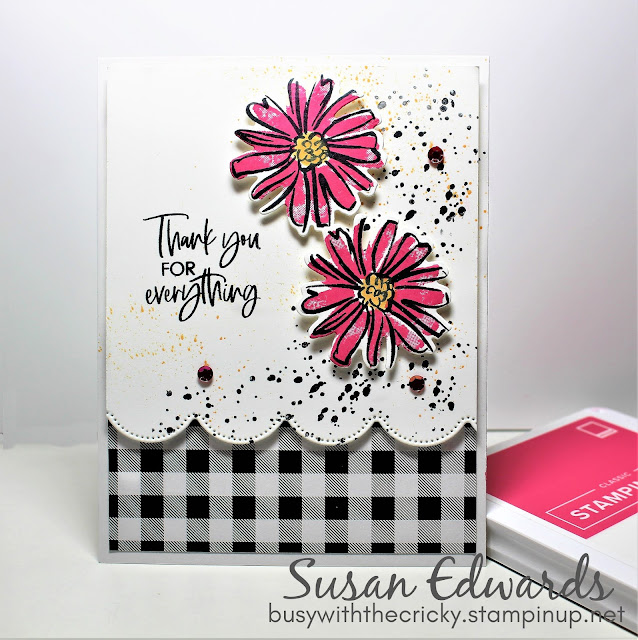
Today is a rainy Monday here in South Carolina so I thought I would brighten up things just a bit with this super fun Polished Pink and black checked card.  I created this card using one of my favorite new products in the Stampin' Up! 2021-2022 Annual Catalog, the Color & Contour Bundle

The Color & Contour Bundle is a thirteen-piece stamp set combined with an eight-piece die set - that is to die for (ha ha). Seriously, this die set is gorgeous. I love the scalloped layered dies, the flower cut outs, and the scalloped border die. Remember a border die does not always have to be used on the edge of the card!


I chose a Polished Pink, Black, and White color palette for this card. My base card was made with thick white cardstock with a layer of black and white designer series paper and white cardstock added to the front. I cut bottom edge of the white cardstock with the scallop border die from the bundle. I added black speckles to abstractly to the card front with the speckle stamp in the set. I also added Pale Papaya speckles by flinging the color off of a marker onto the cardstock. I affixed the black check paper flat to the lower front of the card. I used dimensionals to affix the white portion to the upper front of the card.

I stamped the fun two-step stampin' flowers in StazOn black ink, then stamped the abstract petal fill-in stamp in Polished Pink, one of the new In-Colors. I colored the center of the flower with a marker. I stamped and cut two of the flowers. Using dimensionals, the flowers were added to the upper portion of the card front.


Using the fun "Thanks for everything" stamp, I stamped the sentiment onto the left front of the card in Black ink. The card with finished with pink and black inked sequins.

If you like my card, please take a minute and pop over to Kylie's blog and vote for me. Thanks!


Thanks for stopping by today. I hope you enjoy the remainder of the blog hop!


Product List

Join Me on June 26 for the Peach Workshop Register by 6/10!

 Registration must be submitted by June 10!!


Join me on Saturday June 26th 10:30 am for a fun workshop and lunch featuring Stampin' Up! gorgeous "You're A Peach" suite. We will make eight cards and a 3D project.

You will receive:
  • Sweet As A Peach Stamp Set
  • Half a package of You're A Peach Designer Series Paper
  • Kit with all projects pre-cut
  • Mini Peach Crate (pictured above)
  • Package of Gem Embellishments
  • A welcome gift
  • Lunch and beverages

The cost is:
Option #1 In Person - $50.00
Option #2 By Mail - $55.00 (minus lunch, of course)

Optional Add-ons (with no additional shipping cost to you):
  • Peach Die Set $23.00
  • Spool of Ribbon $ 8.00
  • White Memories & More Card and Envelope set $10.50


You will receive this stamp set in your kit:


You will receive this 1/2 Package of this paper in your kit:


Add-on Options - When you add any or all of these options to your cart you will not be charged additional shipping:

Peach Dies $23.00

10-yard Spool of Ribbon $8.00

10-pk of Cards and Envelopes with note cards $10.50


PLEASE EMAIL ME AT sre433@att.net with your class choice and any add-ons and I will invoice you through paypal.

Hand-Penned Watercolor Card

Hello Stampin' Friends. We are coming off a long weekend here in the US, so I may seem a day late on this post. Today I am back with a "technique card." I wanted to show you a different way to use your Stampin' Up! ink pads. 

For this card I stamped a floral image from the Hand-Penned stamp set onto white cardstock using StazOn Jet Black Ink. Quick lesson - When planning to use watercolor on am image, stamp with StazOn ink. When planning to use out Stampin' Blend Alcohol Markers, always use Memento Ink. Each ink has different properties that allow them to serve different functions.

Anyway, I stamped the image and then I took an empty stamp block and stamped it in the Polish Pink ink 
(far left side of the image below) to use as a watercolor wash for the two larger flowers. I used our AquaPainter brushes and applied a bit of water to the ink, then brushed the ink on to the stamped image.

I continued this process with different colors, washing the brush tip in between until the image was all water colored. I then used the coordinating Hand-Penned die and cut out the bouquet.


I chose thick white cardstock as my base card and Hand Penned DSP for the background. I also wanted to use out Basic Border Dies, so I added a layer of vellum. I used one of the border dies to cut the print background and the vellum before affixing the layers to the card.


I cut the smallest tag from our Tailor Made Tags and stamped the Thanks sentiment. I finished the card with 1/4-inch white seam binding ribbon and opal round gems. 

For more details on products I used, click on any of the links below.


Product List