Blossoms in Bloom Bundle


Hello friends! I hope your day is going well. Today I am going to spotlight the Blossoms in Bloom Bundle. This bundle includes two sets of dies (three in each set) and a set of stamps. The potential of this set is something I am just beginning to be realize. 

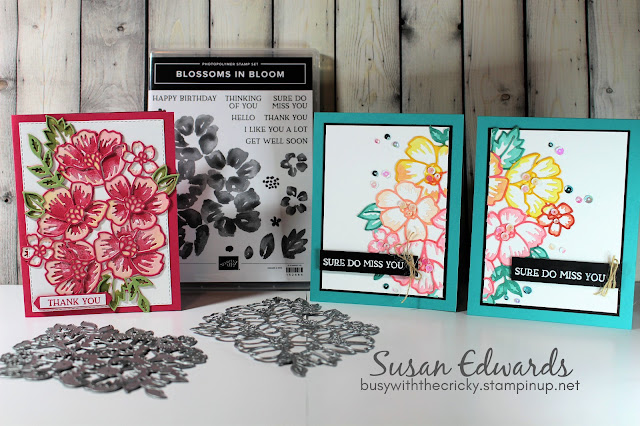
The dies are two layers of cuts, the bottom layer is an open-centered filler for the petals and leaves, while the second die is a thin outline. If you look at the image below, you will see the different layers. The pale Blushing Bride petal sections and the dark green portion of the leaves are the bottom die cut. The thin outline and the lighter green section of the leaves is the top die.


To create this card I stamped the five flower main stamp in Melon Mambo. I cut the bottom layer of the die in Blushing Bride cardstock, then colored over the leaves with an Old Olive marker. I cut the top layer of the die twice, once in Melon Mambo and once in Pear Pizzazz cardstock. I snipped away the leaves from the Melon cardstock and replaced them with the leaves from the Pear cardstock. I glued all of the layers together, and added a Thank You sentiment to the lower left.


These two cards were created by cutting the large dies, bottom and top layers, once each, in Whisper White cardstock. I used Stampin' Blends markers, which come in a lighter hue and a darker hue, to color the layers. For example, the leaves are colored with the Pretty Peacock Stampin' Blends - lighter hue on the bottom, darker hue on the outline section. I did this hand coloring technique, working one flower at a time, over the entire two die cuts. Once I finished all of the coloring and glued the layers together, I cut the the bouquet in half with my paper trimmer. I used half of the bouquet on each of the two card fronts. 


As a reminder, if your Stampin' Up! wish list is bigger than your wallet, now is an excellent time to become a Stampin' Up! Demonstrator. This month only when you sign up you can select any bundle in the new catalog for free. You can also select $125 in Stampin' Up merchandise, anything in the catalog, all for only $99. Stampin' Up! will even throw in $50 worth of business products.  If you would like to hear more about this opportunity, contact me. If you would like to read more about this, visit my webpage.


Product List

Forever Greenery Card Duo


Hello friends! Today I am back with another of the new catalog bundles to share with you. Today's bundle is FOREVER GREENERY, which is part of the larger suite of products called the Forever Greenery Suite. I used the Forever Fern stamp set and the Forevery Greenery dies to create the elements on today's two cards.


The card above began with a watercolor ink circle on Whisper White cardstock. After making the circle, the rest of the card design just sort of came together. I stamped images from Forever Fern stamp set coming out of the circle. I used a die from the Stitched So Sweetly dies and cut out the white scalloped rectangle. I then stamped two images, the berries, in Pretty Peacock and Seaside Spray ink and cut the images with the Forever Greenery dies. Stamping dimensional pop dots were added to the back of the die cuts. I also used the new Gold Hoop embellishment, adding ribbon. The white rectangle was then placed on top of matting cut with Pretty Peacock cardstock and the Forever Greenery Designer Series Paper. The matting layers were adhered to a card base made with Just Jade (**NEW IN COLOR) cardstcock. 


The second card in today's duo was also created using the Forever Greenery suite of products. This card began with a Pretty Peacock base card. I added a strip of designer series paper and I used one of the two Forever Greenery embossing folders on Just Jade cardstock for the front of the card. I used a circle and foliage laser-cut piece from the Forever Greenery Gold Laser-cut paper. I added Peacock and Bermuda Bay die cut pieces around the  the edges of the gold foliage. I punch a circle and stamped a sentiment. I added gold twine behind the layers and round the circle to finish the card.

I will be back later this week with another bundle of products to share. 


Shop with me at busywiththecricky.stampinup.net, or click the links below to go straight to the products used.


Product List

Jars of Flowers


Hello friends! I am back today to share another fabulous new bundle from the NEW 2020-2021 Stampin' Up! Annual Catalog. But first a bit of information on how I selected what to share with you. I am sure that most of you know as a Stampin' Up! demonstrator, I am able to pre-order products with which to create samples BEFORE the catalog goes live to the general public. And while I LOVE this perk of being a consultant, there is one glitch. Not all of the new products are available for pre-order! So I am sharing the bundles/suites that I could pre-order, as I wait for my full catalog release items to arrive. The catalog went LIVE to the public on June 3. And you better believe on June 3 I ordered what I perceive to be my favorite suite! 

In the meantime, I have several other new favorite bundles and suites to share with you. LOL. Today I am sharing Jars of Flowers bundle. It is part of the larger Flowers For Every Season suite. I did not plan to fall in love with this set, but of course I did. 


The stamp set comes with four different bouquets to stamp, as well as the jar, water line, lid, etc. So cute! On the cards I am sharing today, I used two different techniques to color the flowers. Technique #1 is shown in the image above. I used a watercolor brush and ink to watercolor in the image. I stamped the image with StazOn ink then used the watercolor ink technique. 

I used the Flowers For Every Season Memories & More Cards & Envelopes. These cards are wonderful. The set includes ten card and ten envelopes, two each of the new In Colors - Misty Moonlight (pictured above), Magenta Madness, Bumblebee, Just Jade, and Cinnamon Cider. I used a Misty Moonlight card base for this card. 

The center white rectangle was cut using the Stitched So Sweetly dies. I confess that this is currently my most used set of dies.


The second coloring technique I used was coloring with the Stampin' Blends alcohol makers. First I stamped the image in Memento Ink, then colored. I love the softness of this technique.  The markers come in sets of two, a lighter and a darker hue which combine together to create dimension and depth in the stamped image. This is especially evident in the leaves and large rose pictured below.


In the image above you can see that this is a shaker card. Stampin' Up! created jar domes to use over the punched and stamped image to create a 3D shaker card. 

I used a Whisper White base card and layered two prints from our In Color 6x6 designer series paper, in Misty Moonlight.

I will tell you about the new punch and die set I used to make the sentiment tags in a later blog post. 


 Have you ever thought of becoming a Stampin' Up! Demonstrator? If so, JUNE is YOUR month to make that move! June 3-30 Stampin' Up! is offering you the opportunity to select your own kit, $125 worth of SU products of your choice, for only $99. In addition, what makes June such a good month to become a SU demonstrator is the June Special. From June 2-30 you can select any BUNDLE in the new catalog for FREE when you sign up. That mean you can take the punch and stamp set used above, for FREE, along with purchasing $125 worth of merchandise for only $99. 

If you would like to hear more about the joy of being a SU demonstrator, email or call me!! I like to say that this little hobby has turned into a nice little jobby!


Product List