Thank You Cherished Friend


Hello friends, thank you for joining me for today's blog hop. I am joining Kylie Bertucci's International Highlights Top Ten Winners Blog Hop. This hop highlights the top ten winners from our blog hop earlier this month. I am thrilled to have made the top ten and to be part of Kylie's hop. The theme for for the blog hop is THANKS. 


I am using the Tasteful Touches bundle for today's nearly monochromatic card. The card features four main levels: a Pretty Peacock mat, a custom made background (more on this below), a double layer embellished sentiment, and a stamped flower and leaves. 


To create the custom background, I began with a 4" x 5" piece of Stampin' Up! watercolor paper. Using the second largest stitched rectangle die, the paper was cut to size. The cut watercolor paper was then taped to a work surface using crafter's easy release tape (note the white edges where the tape was  uniformly applied to butt against the stitched line). 

Using Pretty Peacock ink, water, and a large sponge, I sponged a watercolor background onto the paper. After the background dried, I used versa ink and stamped the decorative squares stamp in a random pattern. White embossing powder was applied to the versa ink and heat embossed. The final step in creating the custom background was to dry emboss with the Tasteful Textile 3D embossing folder. 


The Sentiment tag was cut using a Tasteful Touches die. I cut the tag in Whisper White and Pretty Peacock cardstock. The peacock tag was cut in half horizontally and glued to the back of the white layer so that it shows at the top and bottom. The two part sentiment was stamped in Pretty Peacock Ink using Lovely You and Peaceful Moments stamps.

The flower was stamped in Pretty Peacock ink on Whisper White, then colored with Pretty Peacock Stampin' Blends. Embellishments were added to finish the card.


Product List

July Class TO GO


Hello friends. Today I am sharing my July Class TO GO! Covid-19 and my adherence to Social Distancing has forced me to discontinue my home based workshops and classes. In an attempt to reach my current and potential new customers, I have designed a Class TO GO! 


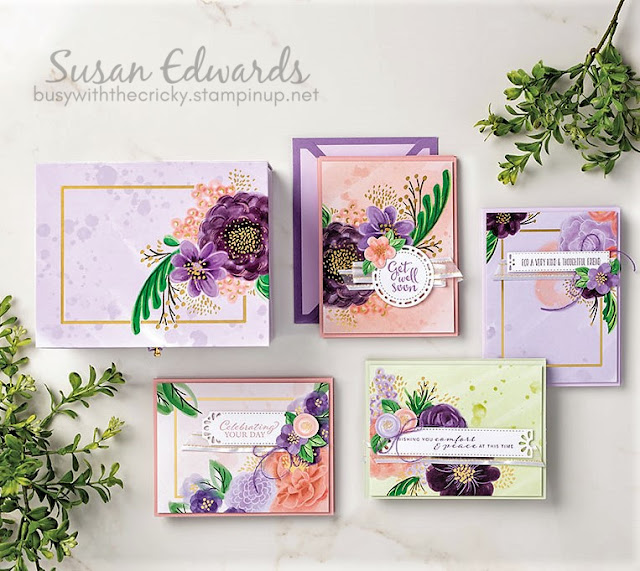
To get you and I started with classes that are not face to face, I am starting with a kit in the new 202-2021 catalog, Gorgeous Posies. It is a card kit with materials (pictured above and below) to make sixteen stunning cards with matching envelopes, with leftover product, all packaged in a beautiful storage box.


Everything you need to make the card, except the stamp set, is included in the kit. You can use stamps you already own to complete the card kit, or you can go one step further and purchase the matching Stampin' Up! stamp set: Gorgeous Posies.


With the purchase of the card kit and the stamp set, you will then qualify for my Thank You add on. I will send you the cut materials to create five additional cards with leftover elements from the kit. The five cards I designed are pictured below. The card pieces and the instructions will be mailed to you the first week of August, as this special is only good for the month of July.


While the card kit and stamp set can be purchased for months to come, my THANK YOU special is only available thru the end of July. Please use the host code in the image below when you place your order.

I will list the ink colors used and additional supplies you might be interested in.


To order, click on the images below.


Product List

Blog Hop with Gratitude


Hello friends. Today I am joining the Monthly Team Blog Hop with Kylie's Stampin' Up! Demonstrator Training Program. We are a group of Stampin' Up! Demonstrators from all of over the world who are part of Kylie's training group. If this is your first visit to my blog, welcome!! 

I jumped right in to this blog hop with this happy blue bird card I created using the Birds & Branches Bundle found in the 2020-2021 Annual catalog. I chose an almost monochromatic palette for this Z fold card. 


This card showcases on of our new in colors, Misty Moonlight. The base card and the circle die were created with Misty Moonlight. The Z-fold design card features an attached inner card with three decorated panels, the front, the middle, and the inside back of the card. The inner card is made with Night of Navy card stock. On the Whisper White front I featured  the circle die from the bundle, cut out with a scalloped circle die, the bird's nest, and mama bird watching over her eggs. 

The bird stamp is a two step stamping process. I used two colors of ink, Misty Moonlight and Seaside Spray.  


The middle panel in the card features the same Flowers for Every Season designer series paper used on the back area of the Z-fold, and another sweet little blue bird.


The back inside panel again features a sweet blue bird, but also the follow up sentiment which coordinates with the Thank You phase stamped on the front of the card.


To complete the card I embellished with little light blue flowers accented with in-color enamel dot Bumblebee centers and a double ribbon bow.  


Below you will find the links to continue on the blog hop. Thanks for hopping by and I hope to see you again soon.


Product List