Color and Contour Fun


Hello stampin' friends. I told you recently that I would be back with another preview of the FABULOUS Color and Contour stamp and die set bundle. This card is more or less lifted from the 2021-2022 Stampin' Up! Annual Catalog, but when they do it SO well, it is worth casing.

First, in addition to using the Color and Contour bundle, I also used four of the five new In-Colors: Pale Papaya, Polished Pink, Fresh Freesia, Soft Succulent, and not pictures, Evening Evergreen.

The base card is Polish Pink cardstock. The scallop edged die is part of the Color and Contour bundle - it is the largest of the five layering dies in the bundle. 

To create the fun striped background, I used our Stampin' Up! Blending Brushes with the in-color inks on white cardstock. I then stamped the fun flowers in black ink and added polished pink ink splatter dots. I finished the card off with in-color gems placed randomly on the card front.


This card looks more difficult to make that it is. It was a quick and simple card, with a huge visual impact. 

I am going to rush off and start dinner, but I wish I could stay and share further.


Product List

Color and Contour Fresh Freesia Card


Hello stampin' friends. Hold on to your stamp blocks because today I am sharing a stunning card created mostly with new products. This card includes a die cut flower from the new Color and Contour stamp and die bundle. The beautiful, scalloped edge cut is also from this bundle. I have NO idea why I used an ornate lacy die when the Color and Contour bundle includes beautiful scallop edged dies too.

I used a new in-color, Fresh Freesia, for the base card. I used the scallop edged die to cut the front edge of the card and the pretty floral Hand Penned designer series paper. I added a white insert inside the card and a cut that with the same die. The bow on the front was made using the Fresh Freesia ribbon - so pretty. 


What I like best about this stamp set is the abstract artsy flowers and the classic scalloped border and layer dies (see image below). It is a great combination of whimsical and classic.

Thank you for stopping by today. I will be back soon with another look at this fabulous stamp and die bundle.


Product List

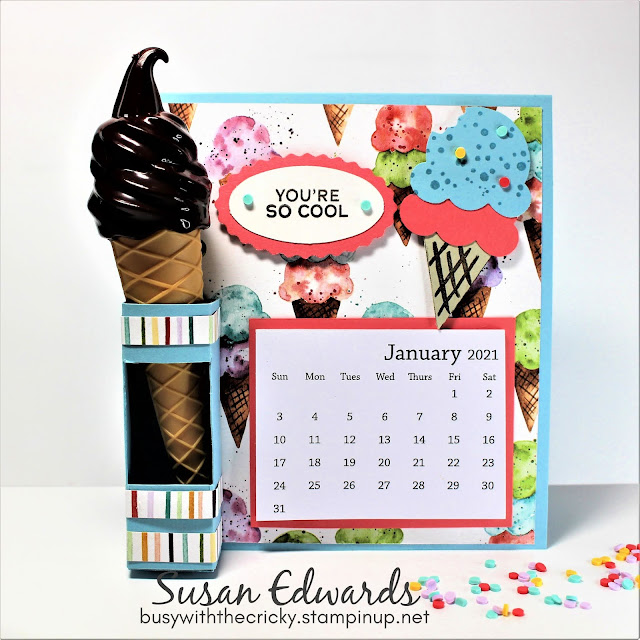
You're So Cool Calendar Tent Card


Hello Stampin' Friends. I am embarrassed that I have not previously shared this fabulous table tent calendar card project that I made back in January! I shared the card on Instagram and Facebook, but I forgot to share it here on my blog. 

Have you seen the Sweet Ice Cream Bundle in the January - June Mini Catalog? There are popsicles and ice cream cone stamps, along with seven sentiment stamps, sprinkles, etc. And!! There is a great ice cream builder punch! It is such a fun and festive set, and the Designer Series Paper is gorgeous (and only available until May 31)!

I created a little pocket to hold my ice cream cone shaped pen, which I found on Amazon. 


I used the double oval punch to create the sentiment tag. I finished the card with ice cream sprinkle embellishments. 


Product List

In-Colors for Quick and Pretty Cards


Hello Stampin' Friends. Today I am sharing a quick and easy card created with the NEW Hand-Penned stamp and die bundle and one of our new In-Colors - Pale Papaya. The Hand-Penned bundle includes a 15-piece stamp set and a 14-piece coordinating die set. There is also GORGEOUS designer series paper and embellishments to match, but for today's card we will be looking at the stamps and dies.

For this card, I stamped the floral outline image in black ink. I then used the second step flower filler stamp and stamped the flower petals in Pale Papaya. I took the largest single flower die and cut it in Pale Papaya cardstock. Before adding that to the card, I cut the scalloped border die (included in the die set) in black. I stamped the word Thanks (from the stamp set) and cut it out by hand. I layered the card elements together on a 4 x 5.25 - inch piece of white cardstock. The cardstock was then affixed to the white card base using stampin' dimensional dots.

Would you like to see this same card in Fresh Freesia? I can show you that!


I am fairly sure I made this same card in Polished Pink, but I must have missed it when I was photographing cards for the blog.

Thanks for stopping by today.


Hostess Rewards For the Win


Hello Stampin' Friends. Today I am featuring a card I created with the Hostess Rewards Pattern Party Designer Series Paper.  When you host a party or place an order of $150 or more (before tax and shipping), you qualify for hostess rewards. In addition to receiving 10%+ in merchandise of your choice, you also have an option to purchase Hostess Only reward items. The Pattern Party Designer Series Paper is one of those reward items.

Pattern Party includes forty-eight pieces of double sided 12 x 12 - inch paper, four sheets each of twelve designs. For this card I used two pieces of the paper: the fourth from the left on the top row, and the fourth from the right on the bottom row. 


I cut the Bumblebee print paper into two strips, and the black and white flower into a single strip. I also fussy cut some of the flowers from the floral paper. I used a dauber and Bumblebee ink and sponged some color into the flowers. 

The strips of paper are mounted on a black matting, then affixed to the white base card. I also cut a sentiment tag in black and white cardstock(s). I stamped a small flower and a sentiment from the Hand Penned stamp set. I finished the card with black ribbon.


I am actually quite fond of this card as it is visually striking in person. 

If you would like to learn more about how to receive this fabulous and LARGE package of designer series paper, sent me an email or give me a call. This paper is gorgeous.


Sweet Jar of Flowers Card


Hello Stampin' Friends. Today I am going to share more of the new products available in the 2021-2022 Stampin' Up! Annual Catalog which are available after May 4th.

Today I am using the new Flowers of Friendship bundle - the stamps and the punch, as well as new In-Colors. I started with a continuing favorite, the Jar stamp from Jars of Flowers bundle. I stamped the Jar in black ink, then punched it out using the Jar punch. I stamped a sentiment from the Flowers of Friendship stamp set. 

Next, I stamped the flowers inside the jar onto the front of my card. I used new In-Color Stampin' Blend markers to color the flowers - Fresh Freesia and Pale Papaya.  I used the stamps and punch to create additional flower and the leaves. The leaves were colored with Soft Succulent. 


 I cut strips of the new in-color cardstock .5 x 4 - inches and affixed them to the card front. I stamped the small flower design under the strips. I used Stampin' Dimensional dots to affix the elements to the front of the card. The card was finished with twine and the new in-color gems. 

I hope you enjoyed this look at how you can combine new products with products you already own to and create totally new projects.